Low flow at one fixture often points to that fixture. A change throughout the house can involve the supply, a leak, a partly closed valve, or equipment that needs servicing.
What feels like low pressure may actually be restricted flow. Before adjusting anything, compare hot and cold water at several outlets and ask whether the change was sudden or gradual. That simple map is more useful than immediately replacing a faucet.
What to check first
Map the affected fixtures
Run one cold tap, then another, and compare the flow. Test hot water separately while avoiding scalding. Note whether the problem appears only when a washing machine or another outlet is running.
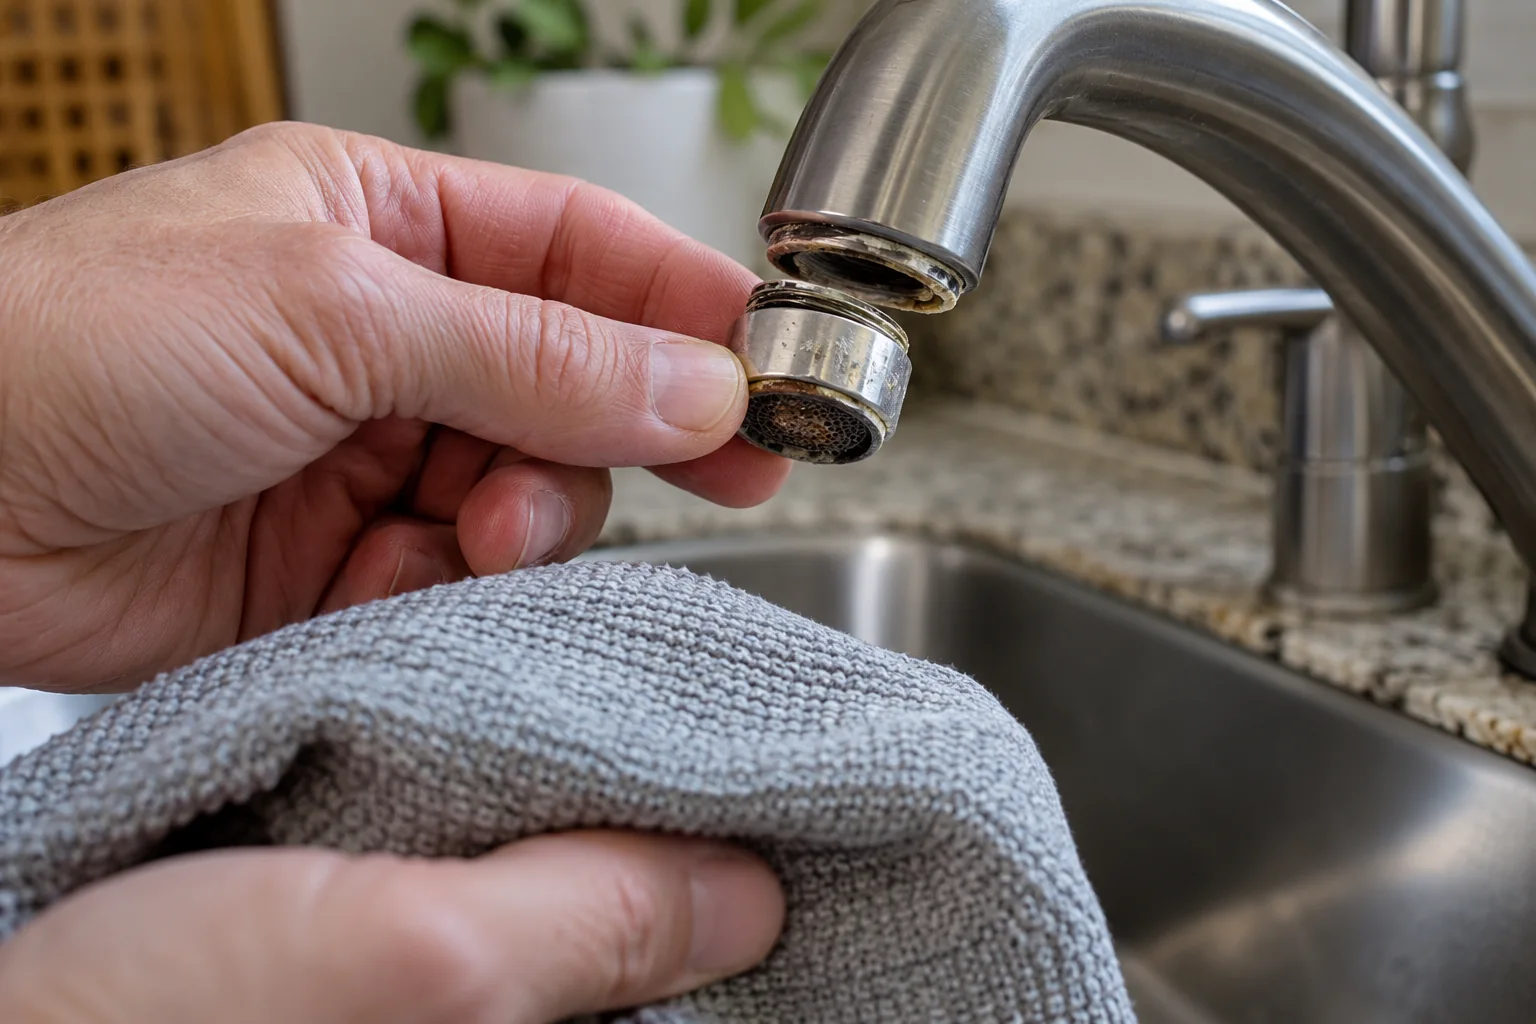
If just one tap is affected, consult its manual about removing and cleaning the aerator. Protect the drain, keep the small parts in order, and avoid scratching the finish with bare pliers.
Build a simple map of the problem
Before touching any valve, test a few fixtures in a deliberate order. Try one cold tap and one hot tap in the same room, then a fixture in another part of the home. Note whether the problem appears only when two outlets run together or even when a single tap is open. A weak spray at one kitchen faucet suggests a local outlet, aerator, or supply issue. Weak flow at every fixture suggests a broader supply or plumbing problem. This map saves you from treating one clogged screen as a whole-house pressure fault.
Write down whether the change was sudden or gradual. A sudden drop after a repair, water outage, or valve work provides a different lead from a slow decline over months. Ask whether neighbors have similar symptoms if you share a public supply; in a building, ask management whether work is underway. Do not assume that a low-flow showerhead proves low pressure. Flow rate and pressure are related but not identical, and fixture design can change the feel of a stream. A qualified plumber can measure pressure when the pattern warrants it.
Separate hot-side and cold-side clues
If cold water is normal but hot water is weak at several fixtures, the issue may lie in the hot-water path rather than the incoming supply. If both are weak at one fixture, that fixture's outlet or local shutoff deserves attention. Test cautiously so you do not scald yourself, and avoid changing water-heater settings for diagnosis. For a single faucet, look at whether the aerator is visibly fouled and consult its maker's cleaning instructions. Photograph its order of parts before disassembly so it goes back together correctly.
Compare observations at a similar time of day. Demand can vary, especially in shared buildings or where irrigation runs. A single test during a busy morning does not establish a permanent fault. Record two or three short observations, including what else was using water. If the problem is severe, do not delay simply to collect more data; contact the supplier, building manager, or plumber as appropriate.
Check recent changes
Think about recent plumbing work, a utility interruption, or a newly installed filter. A supply valve left partly closed or a blocked treatment cartridge can reduce flow. Check the service schedule for installed equipment.
Ask the water supplier about local maintenance before assuming the problem is inside your home. If neighbors report the same sudden change, the supplier can help distinguish a network issue from a household fault.
Review changes without guessing at hidden valves
Think back to recent plumbing work, utility notices, appliance installation, or winter weather. A valve left partly closed after service can reduce flow, but do not turn unfamiliar valves in a meter box or shared plant room. Check only the homeowner-accessible shutoffs you can identify with confidence. If a valve is corroded, stiff, leaking, or not clearly part of your supply, leave it alone. For a rental or multi-unit property, report the symptom to the responsible manager before changing shared equipment.
At one fixture, a clogged aerator or showerhead is a reasonable low-risk check if its finish and manual permit removal. Put a cloth over the drain so small parts cannot disappear. Clean the screen using a method compatible with its material, then reassemble it in the original order. Do not use force on a plated part or acidic cleaner near natural stone. If the outlet improves but other fixtures remain weak, you have solved a local issue, not the broader one. Repeat the fixture map rather than extrapolating from one success.
Treat a pressure regulator as a measured system
Some homes have a pressure-reducing valve or booster equipment; others do not. These parts should not be adjusted on sight. An adjustment can conceal a restriction or create excessive pressure elsewhere. If several fixtures are affected, ask a plumber to measure static and flowing conditions and explain the finding. Share your observations: affected rooms, hot versus cold, time of day, and any recent work. That is more useful than a request to “turn up the pressure.”
A gauge reading alone can also be misleading if the setup is wrong or the condition is intermittent. What matters is the diagnosis in the context of the plumbing design, supply, and fixtures. Avoid internet instructions that assume every house has the same regulator location or safe adjustment range. Keep a copy of any measurement and repair notes so a future technician can compare them.
Look for signs of leakage
Check visible pipes and the area under sinks for dampness. If you know how to read your meter, observe it with all water-using appliances and fixtures off, allowing for automatic systems such as irrigation.
Unexplained meter movement is a reason to investigate; it is not enough by itself to identify a hidden leak. Damp walls, water sounds, or an unexpectedly high bill warrant prompt attention.
Look for loss of water, not just weak output
Low flow sometimes arrives with an obvious leak, damp cabinet, running toilet, wet wall, or unexpectedly high meter use. Walk the accessible route from the main shutoff to visible fixtures without opening walls. Look under sinks, around appliance hoses, near the water heater, and at exterior taps. Use a dry tissue to check a suspicious connection; a small seep can be easier to see that way. If there is standing water or a growing wet area, prioritize isolation and repair over further fixture tests.
An unexplained wet patch, warm area on a floor, or water sound when all fixtures are off deserves prompt professional assessment. Do not cut into a wall or floor to follow a suspected pipe. If water is near electrical equipment, avoid the area and seek urgent qualified help. If you can safely reach a known main shutoff, closing it may limit damage while you arrange service. Know where that shutoff is before an emergency, but do not force a valve that might break.
Check whether consumption explains the symptom
A dishwasher, washing machine, irrigation zone, or another person showering can affect the experience at a tap. Test again when large users are off. If the issue occurs only when several fixtures run, tell the plumber exactly which combinations trigger it. That pattern can help distinguish a local restriction from a system capacity or supply issue. Do not conclude that a larger pump is needed based on one simultaneous-use test; the right solution depends on the measured cause.
If the water utility has reported work or a main break, follow its guidance about service restoration and water quality. A pressure change after an outage may bring debris to small fixture screens. Check the supplier's notice before cleaning or using water. If water looks discolored, smells unusual, or the supplier issues an advisory, follow the official instructions rather than treating it as a simple pressure nuisance.
Leave pressure adjustments to diagnosis
Do not turn a pressure-reducing valve at random. Increasing its setting may hide another fault or exceed equipment limits. A plumber can measure pressure and flow, examine the regulator, and assess old supply pipework.
Decide what belongs in a professional diagnosis
A plumber should assess persistent whole-house weakness, repeated pressure swings, signs of a hidden leak, noisy pipes after pressure changes, or a valve that will not operate safely. Provide a concise symptom timeline. For example: “Cold and hot flow became weak at the upstairs bathroom after utility work; kitchen cold is normal; it is worse during simultaneous use.” This is much more actionable than “the water pressure is bad.” Include photographs of accessible leaks and any notice from the supplier.
Ask what was measured and where. Was pressure evaluated with fixtures closed and while water was flowing? Was the issue traced to the supply, a regulator, a filter, a particular branch, or an outlet? The answer should lead to a repair recommendation that addresses the cause. If a recommendation involves replacing extensive piping, request an explanation of the evidence and the alternatives. Do not assume that old-looking pipe alone identifies the present restriction.
Keep a record after the fix
Once an aerator is cleaned, a valve corrected, or a professional repair completed, repeat the same fixture map you used at the beginning. Test the originally affected outlet and at least one comparison point under similar conditions. Check repaired connections for moisture. Note whether the change holds over several days. If the symptom returns, the before-and-after record helps distinguish an incomplete repair from a new issue.
For future resilience, label known homeowner shutoffs and keep the supplier's contact information with your home records. During normal cleaning, notice drips and damp cabinet floors. A pressure problem can be a simple screen obstruction, but it can also be a clue to a leak or supply fault. Methodical comparison, safe observation, and measured diagnosis are more reliable than turning the nearest adjustment screw.
Make the next decision from evidence
Before buying another part or repeating a treatment, compare the current symptom with the one you recorded at the start. Has the frequency, location, sound, smell, or amount of water changed? A partial improvement can mean the first issue was real but not the only issue. Write down the single action you took and what happened afterward. A photograph or short video is useful when a fault appears only briefly. Keep the record factual; “ran for two minutes after the cycle ended” is more useful than “seems broken.”
If the first safe check does not explain the problem, return to the affected-versus-unaffected comparison. Check whether the issue follows one fixture, one room, one operating mode, or the entire system. This pattern can prevent unnecessary replacements. Do not keep resetting an alarm, breaker, or safety cutout to gather more observations. A stop signal is itself evidence that the owner-level investigation has reached its boundary.
Hand off a useful case
When you contact a professional, provide the model or fixture type, the timeline, the conditions that reproduce the problem, and the checks you have already completed. Ask what the technician plans to measure or inspect before authorizing a major replacement. If the proposed work changes after the inspection, request a clear explanation of the new finding. Keep invoices and part information with your home records. This makes a return visit easier to evaluate.
After any correction, test the original symptom under normal conditions and then check for new leaks, odors, noises, or error indicators. A quiet moment is not proof that an intermittent fault has gone. If you cannot verify the result safely, ask the service provider to demonstrate it. The point of troubleshooting is to narrow the cause and make an informed decision, not to keep working until every component has been disturbed.
Frequently asked questions
Why is only hot water weak?
The issue may be in the hot-water path, a valve, or the appliance. Do not open or adjust the water heater to investigate.
Will a new showerhead fix it?
Only if the old head is the restriction. Check other fixtures before buying one.