Keep the sink cabinet easy to inspect, check the supply and drain areas while they are in normal use, and respond to moisture at its source. A liner can help you notice drips, but it cannot replace a sound connection or dry out a damaged cabinet.
The first sign of an under-sink leak is often a swollen shelf or a musty smell, not a dramatic puddle. A short, repeatable inspection can reveal where water starts, what is at risk, and when a plumber is needed. This guide focuses on safe observation and prevention rather than disassembling plumbing.
Plan the next check
- 01Map the water paths before you store anything
- 02Inspect supply and drain connections safely
- 03Protect the cabinet and deal with moisture promptly
- 04Build a simple inspection routine
Map the water paths before you store anything
Empty the cabinet enough to see the floor, side walls, supply hoses, shutoff valves, drain trap, and any dishwasher or filter lines. Photograph the dry starting condition. Identify which pipes carry pressurized water and which parts only see water when the sink drains.
Keep food, paper goods, and electrical devices out of a space where a leak could reach them. Make sure you can reach a known shutoff without moving a heavy stack of bottles.
Establish a dry baseline
Take everything out of the cabinet and place it on a towel, keeping cleaners away from food and children. Wipe the floor, walls, and accessible pipes dry. Wait until the surfaces have fully dried before calling the cabinet sound. Particleboard can swell at the edges while the center looks normal, and a small drip may follow a pipe before reaching the floor. Photograph the empty cabinet from the same angle you can use on future checks. In the photo, capture the underside of the sink, the trap, both supply connections, any filter or dishwasher line, and the cabinet floor. A dry baseline makes a later dark mark meaningful.
Look for an old ring, bubbled laminate, loose edge banding, rust, peeling paint, or a musty smell. These clues may remain after the active leak has stopped. Note whether the cabinet is beside a dishwasher or refrigerator water line; not all water under a sink comes from the faucet. If the cabinet is damp now, do not restock it just to finish the organizing task. Find and stop the source first. The US EPA emphasizes prompt leak repair and complete drying because persistent moisture can support biological growth.
Separate the paths water can take
Supply lines and fittings carry water under pressure whenever their valves are open. Drain pipes see water mainly when the sink empties. The sink rim, faucet base, and countertop seam can admit splash water from above. A garbage disposal or filter system adds its own connections. These paths create different test conditions. A dry cabinet during a ten-second tap test does not rule out a drain leak that appears when a full basin empties, or a supply seep that develops while the faucet is off.
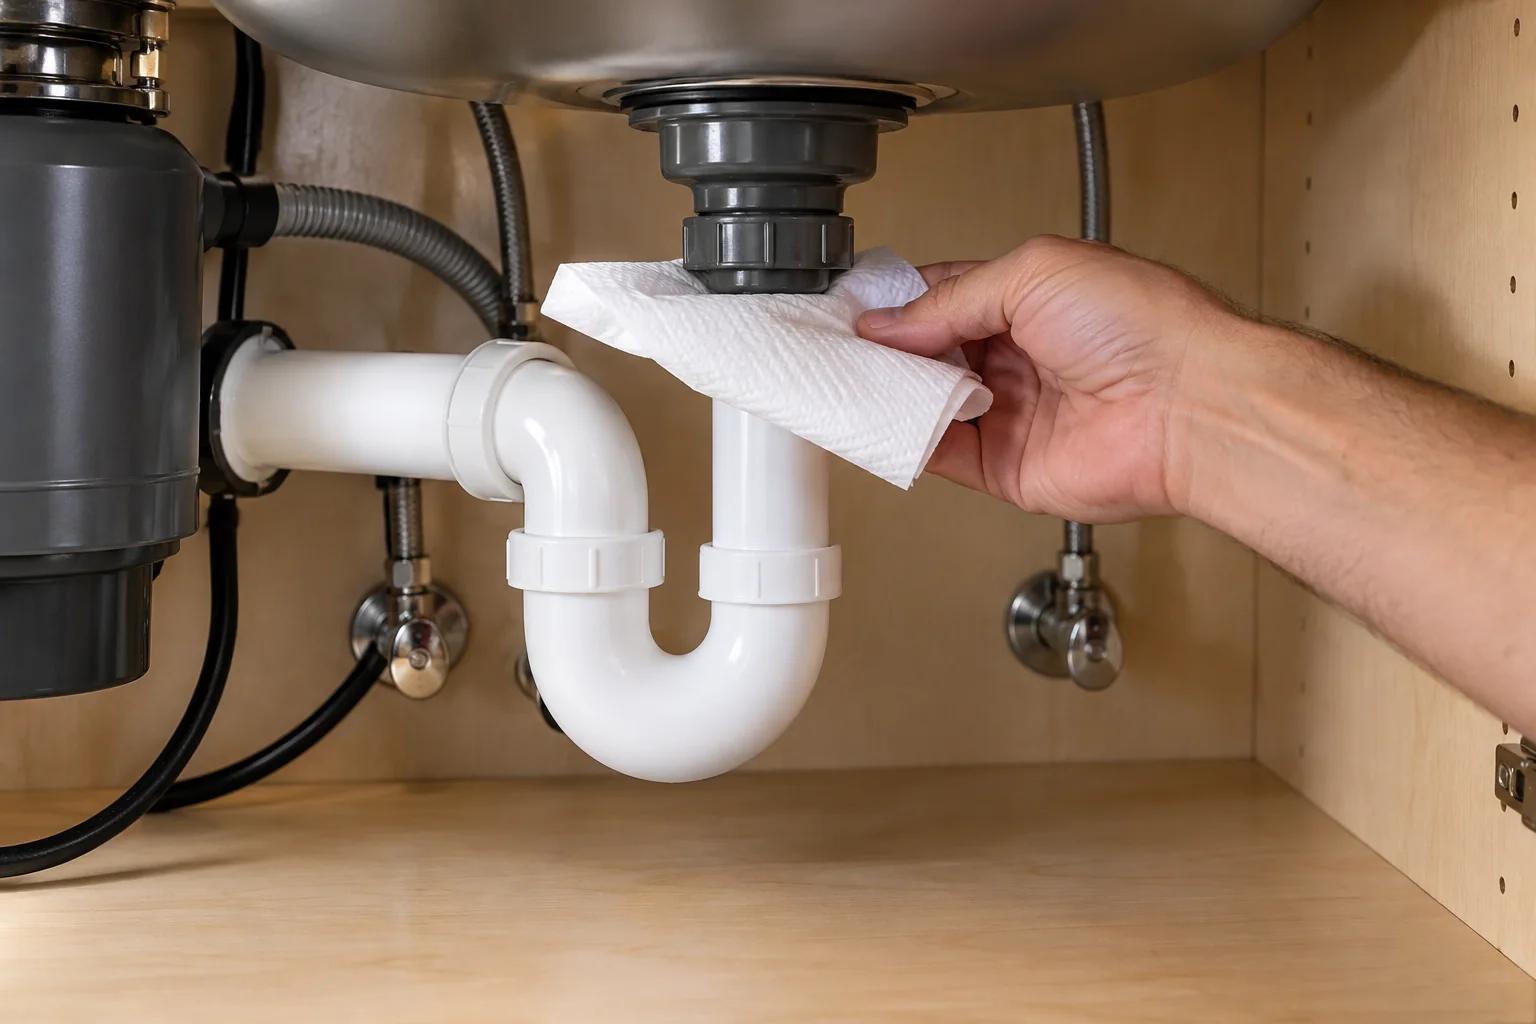
Map each connection by looking, not by dismantling. Put a dry tissue beneath one area at a time and note whether it becomes damp. Check the back wall and the cabinet corners, where water may collect out of immediate view. Avoid reaching across an outlet or plugged-in disposer. If an unknown line or device blocks your view, document it for a plumber rather than pulling it aside. Keep the sink's shutoff valves accessible, but do not assume an old valve will operate smoothly when needed.
Store for inspection, not concealment
Deep stacks of bottles can hide a drip and press on flexible hoses. Leave a visible corridor around connections and keep heavy containers away from valves. A single removable bin can hold cleaning supplies while allowing the whole cabinet floor to be seen quickly. Choose a bin that can be lifted without snagging a hose. Do not hang a heavy organizer from a pipe or hinge. If household chemicals are stored there, keep them in original labeled containers and follow their safety instructions.
A light-colored tray or liner can make a new drop obvious. It should be shallow enough that you can see water before it accumulates and removable so you can inspect beneath it. A tray full of water is an alarm, not a reservoir to empty indefinitely. No liner can protect the wall cavity, the subfloor, or an adjacent cabinet from an unresolved leak.
Inspect supply and drain connections safely
Use a dry tissue beneath an accessible connection while someone runs the faucet, then repeat when water drains from a full sink. If moisture appears, note the exact location and stop testing before the cabinet becomes wet. Do not tighten a pressurized fitting by guesswork.
Check flexible hoses for kinks, corrosion, bulges, or rubbing. A shutoff valve that will not turn or begins to leak is a repair issue, not an invitation to force it.
Run short, separate observations
Begin with the cabinet dry and the floor protected by an absorbent towel outside the work area. Ask another person to turn on the cold tap while you watch from a safe position, then repeat with hot water. Observe the faucet base, supply hoses, valve stems, and connection points. Stop as soon as fresh water appears. A tissue can reveal a tiny seep at a visible fitting, but do not wrap it around an electrical component. If nothing appears, fill the sink briefly and release water through the drain while observing the trap and joints. These are separate tests because they exercise different parts of the system.
Do not continue filling and draining a sink that has already produced a leak. Water can soak the cabinet quickly. Photograph the exact wet point if it is safe, then close the appropriate accessible shutoff if it works smoothly. A drain-only leak may stop when the sink is no longer used; a supply leak can continue until isolated. If you cannot identify or safely operate the shutoff, arrange urgent plumbing help. Do not force a stiff handle or loosen a fitting while water is supplied.
Inspect hoses and connections without disturbing them
Look for fraying, kinks, corrosion, bulges, rubbing against a cabinet edge, or a hose that is stretched when a pull-out sprayer moves. These observations warrant action, but they do not tell you which replacement fits. The faucet maker's instructions and a plumber can identify the correct hose, seals, and fittings. Avoid turning a compression nut “just a little” based on appearance; overtightening can damage a seal or crack a fitting. Do not use sealant tape as a generic cure for every drip. Different connection designs seal in different ways.
Move the faucet and sprayer through their normal range while watching the accessible hose route. A flexible line might only leak or rub when the sprayer is extended. Keep your hand clear of sharp cabinet edges. If the disposer or dishwasher is connected under the sink, test only through normal operation and consult its manual. Electrical equipment in a damp cabinet changes the safety decision; do not reach in to diagnose it.
Protect the cabinet and deal with moisture promptly
A removable, waterproof tray can make small drips visible and protect a sound cabinet floor from incidental splashes. It must be easy to lift so moisture cannot hide beneath it. Do not cover an already wet or swollen surface with a liner.
If a leak has occurred, stop the water safely, remove wet items, and dry the area. Look for softened board, staining, persistent odor, or water outside the cabinet. Larger or hidden damage needs qualified assessment.
Respond to wet materials in the right order
First stop the water safely. Then remove stored items, absorb standing water, and expose wet surfaces to appropriate drying. Do not paint, caulk, or install a new liner over damp board. The EPA recommends fixing leaks promptly and drying wet materials completely; if porous cabinet material has swollen or cannot be dried, it may need replacement. A dehumidifier or fan may help only when used safely and when the underlying leak has stopped. Follow the appliance instructions and keep electrical cords out of wet areas.
Check beyond the visible cabinet floor. Water can run behind the back panel, into the toe-kick, or toward an adjoining unit. A dry top surface does not prove that the subfloor is dry. If the cabinet smells musty, the wall is soft, or stains reappear, request a qualified assessment. Larger mold or extensive water damage is not a routine wipe-down. Avoid disturbing suspected growth or enclosing it under a new finish.
Decide what can be cleaned and what needs replacement
A smooth, intact surface with a small, recent splash may be cleaned and dried. Swollen particleboard, delaminated veneer, or a persistent soft edge will not regain its original strength by drying alone. A cabinet base may require repair even after the plumbing leak is fixed. Keep a photo of the damage before removal and ask what material beneath it was checked. If the leak reached flooring, baseboards, or electrical components, involve the relevant qualified professional.
Do not rely on fragrance to make a musty cabinet seem resolved. An odor can come from a damp hidden surface. Likewise, a stain left by an old leak is not proof of a new one. Compare it with the baseline photo and use dry-tissue observations to detect active moisture. Where there is uncertainty, measurement and professional assessment are more reliable than repeated cleaning.
Build a simple inspection routine
Check the cabinet after plumbing work, appliance installation, or a change in faucet behavior, and include it in a monthly home-maintenance walk-through. Use the same dry-tissue test and compare with your baseline photo.
Record the date, any moisture, the fixture used during the test, and the action taken. A recurring drip or failed shutoff deserves a plumber rather than a deeper tray.
Make the check repeatable
Once a month, open the cabinet, lift the bin or tray, and compare the floor with the baseline photo. Feel for dampness only on safe, accessible surfaces and use a dry tissue at visible plumbing connections. Run the faucet and drain normally, then check again. The entire routine can be brief because the cabinet has been kept clear. Inspect sooner after replacing a faucet, moving stored items, or noticing a new smell or change in water flow.
Write down the date and the result, including “dry.” A run of dry checks makes a later mark stand out. If you use a sensor, test it at the interval its maker recommends. Ask household members to report a musty smell, a new drip sound, or a swollen cabinet door rather than waiting for the monthly check. Prevention works best when the signs are easy to recognize and the response is clear.
Prepare for an active leak
Know which local shutoff serves the sink and where the building's main water shutoff is, without turning unfamiliar shared valves. If you can operate a known valve safely, closing it can limit damage. If it leaks or will not move, stop and seek help. Keep the plumber or building-manager contact in a place everyone can find. In a rental, report water damage promptly and preserve photographs. Do not move a leaking hose to make space for a bucket.
When you discover water, protect people first: keep away from any electrical outlet, appliance wiring, or wet floor hazard. Then limit water, document the source if safe, and arrange repair. Drying and cabinet restoration follow only after the leak has been controlled. This order prevents the tempting but ineffective cycle of wiping the cabinet while water continues to enter it.
Turn one inspection into a useful routine
A maintenance schedule improves when it records observations, not just dates. Keep a brief note of what you inspected, what you saw, and whether action was needed. Over several cycles, this tells you whether the interval is sensible for your property. A change in season, occupancy, weather exposure, or equipment use can make an old routine too frequent or too slow. Review the schedule when those conditions change instead of treating a printed interval as a guarantee.
Take photos from the same safe position when possible. They make subtle changes easier to recognize and are useful when you ask a contractor for advice. Do not use a photo as a substitute for an inspection where the problem can be hidden. If moisture, noise, or other warning signs appear between scheduled checks, respond then. A calendar is a reminder to look, not permission to ignore an active fault until the next date.
Know what successful maintenance looks like
After a cleaning, replacement, or service visit, check the function that originally mattered. Does water move away, air flow as expected, or the equipment complete a normal cycle? Ask the service provider what they found and whether they recommend any change to the next inspection date. Keep product specifications and invoices so future work starts with accurate information.
If a maintenance task repeatedly produces the same abnormal finding, look for an underlying cause. Replacing a component sooner every cycle may be a symptom-management strategy rather than a solution. At that point, a qualified assessment can be more useful than increasing the frequency again. A good routine leaves the home working reliably and gives you clear signals for when to seek help.
Quick recap
- Map the water paths before you store anything.
- Inspect supply and drain connections safely.
- Protect the cabinet and deal with moisture promptly.
- Build a simple inspection routine.
Frequently asked questions
Will a cabinet liner stop water damage?
It can catch incidental splashes and reveal a small drip, but a liner cannot repair a leak or dry a wet cabinet underneath.
How can I tell whether the drain or supply is leaking?
Observe separately while the faucet runs into a container and while water goes down the drain. Stop once the source is clear or if water spreads.
When should I call a plumber?
Call for an active leak, a failing shutoff, corrosion, recurring moisture, or a source you cannot identify safely.
Sources & further reading
Manufacturer instructions for your exact model take priority.